
Disclaimer:
The information in this guide reflects the most accurate details available at the time of writing. Insurance payer requirements and policies can change—sometimes without notice. Always confirm specific details directly with each payer or credentialing body before applying. We owe a huge thanks to Tiffany Bishop who wrote this guide.
Should You Get Paneled with Insurance Payers?
If you’re a licensed therapist or mental health provider building your practice, getting credentialed (or “paneled”) with insurance payers can be a valuable step. While it takes time and paperwork, being in-network often leads to long-term benefits for both you and your clients.
Here’s why it’s worth considering:
Access to more clients: Most Americans have mental health coverage, and payers often refer clients to their in-network providers.
Increased visibility: You’ll be listed in payer directories where potential clients can easily find you.
Reduced marketing costs: Joining payer panels can reduce your reliance on paid advertising to attract clients.
Improved client retention: When therapy is covered by insurance, clients are more likely to attend regularly and stay engaged in treatment.
Continuity of care: If a client switches jobs or insurance plans, being paneled with multiple payers allows you to continue working with them.
Professional perks: Many payers offer free provider resources, webinars, or training materials for continuing education.
Being in-network doesn’t just make therapy more affordable for clients—it also helps expand your reach and strengthen your professional credibility.
Before You Begin: Set Up the Essentials
Before starting the credentialing process, there are a few key administrative decisions to make. Getting these right early will save time later.
1. NPI 1 vs NPI 2
NPI 1 is assigned to individual providers and is tied specifically to you.
NPI 2 is for organizations or group practices—even if you’re currently a solo provider.
Consider an NPI 2 if:
You plan to expand into a group practice in the future.
You want to bill under a business name rather than your legal name.
You plan to work with payers (like Medicare or certain Medicaid programs) that require it.
Pro tip: Even solo providers often opt for both NPI 1 and NPI 2—it offers flexibility as your practice grows.
2. EIN vs SSN
An Employer Identification Number (EIN) is issued by the IRS for business use, while your Social Security Number (SSN) identifies you personally. When credentialing, you can use either, but there are strong reasons to consider an EIN.
Use an EIN if you:
Plan to expand into a group practice later.
Want to submit claims under a business name rather than your personal name.
Prefer to keep your SSN private.
If you use your SSN instead, it will appear on any superbills you issue and may be visible on claim forms—something many clinicians prefer to avoid.
3. Choosing a Business Address
Even telehealth-only providers need a valid practice address for claims and payer records.
If you don’t want to use your home address, consider alternatives such as:
A coworking space or flex office address (these are widely accepted).
A virtual office service, but note that many payers require a real physical address rather than a P.O. Box.
Choosing a professional address from the start helps ensure your applications aren’t delayed later.
Quick Setup Checklist:
✅ Decide whether you need NPI 1, NPI 2, or both
✅ Obtain an EIN from the IRS if applicable
✅ Secure a professional business address
Steps to Becoming a Network Provider
Start with completing your CAQH profile.
Your first major step is creating or updating your CAQH profile—a centralized database used by most insurance payers to verify your professional and practice details.
Not every payer uses CAQH, but most large ones do. If you plan to join multiple networks, setting up your profile now will save time later.
It can feel a little tedious at first, but expect to spend about one to two hours completing it. Think of it as your universal professional portfolio—once it’s done, you’ll rarely have to re-enter this information again.
Personal Information
Name, address, and contact information
Social Security Number
Individual NPI (Type 1)
Demographics (gender identity, birth date, race/ethnicity)
Professional Information
License details (state, number, expiration date)
Medicaid and Medicare numbers (if applicable)
Education
School name and degree
Dates attended and graduation date
Practice Information
Practice or business name
Tax ID (EIN or SSN)
Practice address and contact information (website, email, phone)
NPI (Type 1 or Type 2)
Office hours and accessibility details
Languages spoken
Malpractice / Liability Insurance
Insurance company name
Policy number
Effective and expiration dates
Employment History
Current and previous employment
Any employment gaps or military service
Professional References
Name, provider type, and specialty
Contact details
Dates of association
Additional Documentation
W-9 form
Copy of professional license
Malpractice insurance policy
Certificates or specialty credentials (if applicable)
Pro Tip: Once you’ve completed your CAQH profile, be sure to attest—this step confirms your information is accurate and makes your profile visible to payers. Without attesting, your profile will remain incomplete and inaccessible.
Decide which insurance payers you would like to join.
Once your CAQH profile is complete, the next step is choosing which insurance payers you want to contract with.
If you’re unsure where to start, ask your current clients, colleagues, or professional network which insurance plans they use or are paneled with. You can begin with just one or two major payers and expand later, or apply to several at once if you’re ready to manage a busier credentialing process.
Common Insurance Payers for Mental Health Providers
Aetna
A nationwide payer that also manages some state Medicaid and Medicare Advantage plans. Reimbursement rates are typically mid-range.
Anthem / Blue Cross Blue Shield (BCBS)
Operates through state-level companies such as Anthem, Regence, Highmark, and Premera. One of the most common and recognizable networks. Credentialing requirements and reimbursement rates vary by state.
Cigna (Evernorth Behavioral Health)
A national insurer with Evernorth as its behavioral health division. Known for initially offering lower reimbursement rates but often open to negotiation.
UnitedHealthcare / Optum
The largest commercial insurance payer in the U.S. and a frequent administrator of behavioral health benefits for other insurers.
Tricare
Provides coverage for military personnel, retirees, and their families. Tricare has more stringent credentialing requirements compared to most commercial payers.
Medicaid
A state-run program offering coverage to children, families, and low-income populations. High demand, but reimbursement rates can vary widely and may be lower in some states.
Medicare
Federal insurance for adults aged 65 and older or with certain disabilities. Rates depend on your location but are often mid- to high-range.
Pro Tip: Don’t feel pressured to join every network at once. Many therapists start with one or two payers that best match their client demographics, then add more as their practice grows.
Create a tracking sheet.
(see link for example). There may be a lot of moving parts or pieces, so it will be good to have all of the information in one central location.

Find Each Payer’s Application Portal
Each insurance payer has its own process, forms, and credentialing systems—so the best place to start is often a simple Google search.
Include the words behavioral health in your search to make sure you land on the right page. For example, try searching:
“Cigna behavioral health credentialing”
As of October 2025, the first or second search result for most major payers will usually take you directly to the correct credentialing portal or application instructions.
Pro Tip: Bookmark each payer’s credentialing page or add the link to your tracking sheet. This makes it easy to return later for status checks or re-credentialing.
Fill Out and Submit Applications
Once you’ve located the credentialing portals for your chosen payers, you can begin completing your applications.
Each payer’s form may look a little different, but the information requested is often similar. Take your time filling everything out carefully—small errors can lead to big delays later.
Pro Tip: Keep a record of all usernames, passwords, submission confirmations, and email correspondence in your tracking sheet. This makes follow-ups much easier.
Documents You May Be Asked to Provide
Signed W-9 Form
This IRS document verifies your business name, address, and tax ID so the payer can issue payments and report your income correctly. You can download a blank version directly from the IRS website.
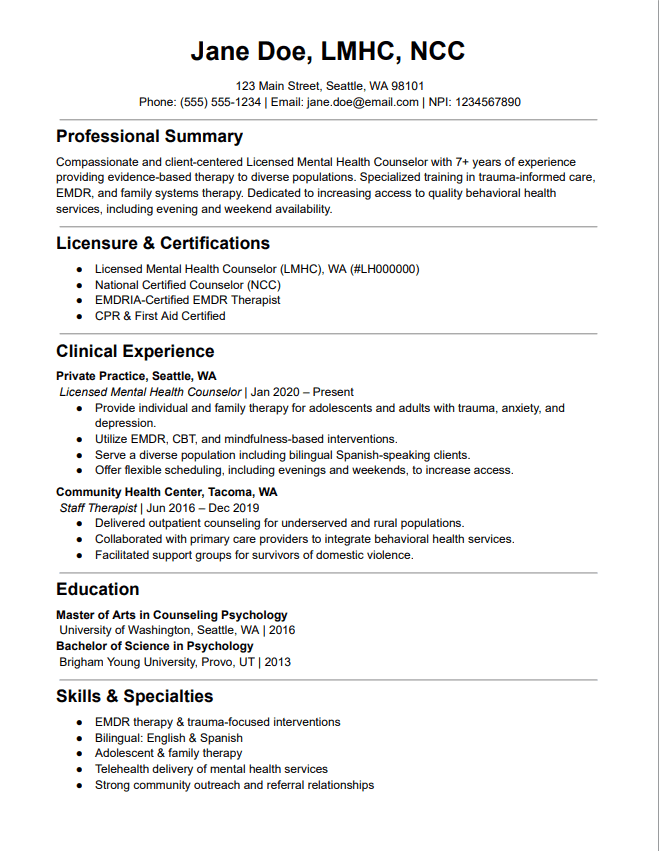
Resume or CV
Keep it concise—no more than two pages (one page if you’re early in your career). Your resume should be accurate, clearly list your licensure, and highlight any specialized skills or training that set you apart as a provider.
Example:
Letter of Interest
Some insurance payers may ask for a letter of interest as part of your application. This is your opportunity to introduce yourself, highlight your unique skills, and explain why you’d be a valuable addition to their provider network.
Think of it as your professional pitch—short, confident, and focused on what sets you apart.
What to include:
Your intent to become credentialed with that specific payer
A brief summary of your qualifications and specialties
Details that make your practice stand out, such as:
Languages you speak
Populations you serve (e.g., rural areas, children, veterans)
Special training or certifications (e.g., EMDR, eating disorders)
Flexible scheduling (evenings, weekends, telehealth)
Representation or expertise that supports diverse communities
Structure:
Opening paragraph: State that you’re seeking credentialing with the payer and introduce your practice.
Body paragraphs: Highlight your specialties, training, and what makes your work distinctive or aligned with the payer’s network needs.
Closing paragraph: Thank them for their consideration and express enthusiasm about joining their network.
Keep it professional but personable, and limit it to one page. Address it directly to the payer’s credentialing department, include the date, and sign it like a standard business letter.
Example:

Complete and Submit Your Applications
Before hitting submit, take a few extra minutes to review your application carefully. Small errors—like outdated license dates or missing attachments—can cause significant delays and may even require you to start over.
Pro Tip: Double-check that all documents match your CAQH information exactly (including your name, address, and tax ID). Inconsistencies between systems are one of the most common reasons for credentialing delays.
Wait for Payer Review
Once submitted, your application enters the verification process. This step can take anywhere from 30 to 180 days, depending on the payer and their current backlog.
While it may be tempting to assume everything is moving along smoothly, it’s a good idea to follow up every 2–4 weeks. A quick check-in helps keep your application from getting lost in the shuffle.
Pro Tip: Note your submission date and follow-up schedule in your tracker to stay organized.
Receive, Review and Sign Your Contract
If your credentials are approved, the payer will send you a contract outlining your reimbursement rates, effective date, and terms of participation.
Carefully review the contract before signing. Pay close attention to:
Reimbursement rates for the CPT codes you use most often
Contract start date (this determines when you can begin billing as in-network)
Once you’ve reviewed everything, sign and return the contract. You’ll receive a countersigned copy from the payer confirming your official in-network start date.
Important: Credentialing approval and contracting are separate steps. You’re not officially in-network until the contract is signed by both parties and the payer confirms your effective date.
Common Pitfalls to Avoid During Credentialing
Even the most organized providers can hit snags during the credentialing process. Knowing what to watch out for can save you time, stress, and unnecessary back-and-forth with payers.
1. Incomplete or Inaccurate CAQH Profile
Your CAQH profile is the foundation of most applications. Missing documents, outdated information, or skipped fields are among the top reasons for rejection or delays. Double-check everything before you attest.
2. Applying Before Finalizing Your Business Setup
If you’re transitioning from a solo (NPI 1) to a group (NPI 2) practice—or changing your tax ID or address—finish those steps first. Making changes mid-process often leads to duplicate work or stalled applications.
3. Using a Virtual or P.O. Box Address
Most insurance payers require a physical practice address for credentialing. Using a non-qualifying address can lead to immediate denial. When in doubt, use a coworking or office address that can be verified.
4. Forgetting Required Documents
A missing W-9, malpractice certificate, or license verification is all it takes to slow down the process. Keep a dedicated credentialing packet with all essential documents ready to upload for each application.
5. Not Following Up
Insurance payers manage thousands of applications at once. If you don’t follow up, yours could easily get buried. Add reminders in your tracker to check in every 2–4 weeks until you receive an update.
6. Submitting a Generic Letter of Interest
If a letter of interest is required, avoid vague or generic language. Use it to clearly highlight your specialties, populations served, or unique training that adds value to their network.
7. Missing Application Windows
Some insurance panels only open for new providers during specific enrollment periods. If you miss the deadline, you may have to wait several months before reapplying.
8. Confusing Credentialing with Contracting
Getting approved for credentialing doesn’t automatically make you in-network. You’ll still need to sign and return your contract before you’re officially paneled.
Next Steps After Credentialing
Once your credentialing is approved and your contracts are signed, there are a few final steps before you can start seeing in-network clients and receiving payments. These post-credentialing tasks ensure you’re set up correctly and ready to bill smoothly.
Organize and Store Your Contracts
Keep a secure copy of every signed contract and fee schedule. These documents outline your reimbursement rates, billing rules, and payer-specific requirements. Having them easily accessible helps with future audits, renewals, or disputes.
Confirm Your Effective Date
Credentialing approval doesn’t always mean you can bill right away. Double-check your effective date—this is the day your in-network status officially begins. Claims submitted before this date will likely be denied.
3. Update Your CAQH and Profiles
Keep your CAQH profile current by re-attesting every 90 days. Update it with any new licenses, insurance renewals, or address changes. Many payers rely on CAQH for ongoing re-credentialing, so accuracy matters.
4. Enroll for Electronic Transactions (EDI, ERA, EFT)
Most payers allow or require electronic enrollment for billing and payments. This includes:
EDI (Electronic Data Interchange): Enables you to submit claims electronically.
ERA (Electronic Remittance Advice): Lets you receive digital explanations of benefits (EOBs).
EFT (Electronic Funds Transfer): Deposits payments directly into your bank account.
If you use an EHR like Allia, much of this process can be handled automatically once you’re connected.
5. Verify Client Eligibility and Benefits
Before seeing new insurance clients, confirm that:
Their plan covers your services.
You’re listed as an in-network provider for their plan.
You understand their copay, deductible, or coinsurance responsibilities.
Doing this upfront prevents billing surprises and ensures smoother payments later.
6. Market Your In-Network Status
Once you’re officially paneled, spread the word:
Update your website and Psychology Today profile.
Notify your referral partners, such as physicians, schools, and community organizations.
Add accepted insurance logos or a “Now accepting [payer name]” note to your online profiles.
7. Track Your First Claims Closely
In your first few weeks of billing, monitor every claim submission. Look out for denials or processing errors and resolve them quickly. Getting it right early helps you establish consistent, timely payments.
8. Plan for Recredentialing
Most payers require recredentialing every 2–3 years. Mark your calendar and set reminders for at least 90 days before the renewal date so you stay in-network without interruption.
FAQs: Common Questions About Credentialing
Even after you’ve read through the process, a few key questions tend to come up for most providers. Here’s what you should know before and after getting paneled.
How long does credentialing take?
Timelines vary by payer. Some can process applications within a few weeks, but most take 2–5 months. In certain cases, it can stretch to 8–9 months, especially if there are errors or missing documents.
How can I speed up the process?
Make sure everything is set up before you start:
Have your CAQH profile fully completed and attested.
Finalize any address or business structure changes first.
Double-check that your malpractice insurance and licenses are current.
Avoid making any major changes mid-application, as this often causes delays or duplication.
Can I negotiate my reimbursement rates?
Sometimes. Many payers have standard rates, but some—like Cigna or certain regional networks—may consider negotiations if you bring unique value. If you specialize in high-demand areas (e.g., trauma, eating disorders, EMDR) or serve underserved populations, you can politely request a rate review when you receive your initial contract.
What’s the difference between credentialing, contracting, and paneling?
Credentialing is the verification of your qualifications and documentation.
Contracting is when you sign the agreement outlining your rates and responsibilities.
Paneling means you’ve been officially added to the payer’s network and can start seeing in-network clients.
Many people use these terms interchangeably, but they’re technically different steps in the same process.
Do I need both an NPI 1 and NPI 2?
If you’re a solo provider, an NPI 1 may be enough. But if you want to credential under a business entity or expand to a group practice later, it’s smart to also get an NPI 2. Note that some payers, such as Medicare, require it.
Should I use an EIN or SSN?
You can use either, but most providers prefer an EIN for privacy and professionalism. Using your SSN means it will appear on claims and superbills, so an EIN is often the safer choice.
What is CAQH, and how often do I need to update it?
CAQH is a central database that payers use to verify your credentials. You need to re-attest every 90 days to keep your profile active. If you don’t, your applications may be paused or rejected.
What happens after I’m credentialed?
You’ll receive a signed contract and an effective date—the day your in-network status begins. You can’t bill as in-network until that date, so confirm it with the payer before scheduling insured clients.
Do I need malpractice insurance?
Yes. Nearly all payers require proof of current professional liability coverage before they’ll approve your application.
What if my application is denied?
Most payers allow you to reapply after a waiting period (usually 6–12 months). Denials are often due to network saturation, not your qualifications.
Will I need to recredential?
Yes. Expect to recredential every 2–3 years. This ensures your license, malpractice insurance, and business details are up to date.
Can clients still get reimbursed if I’m not credentialed?
If their plan offers out-of-network benefits, yes. You can provide a superbill, and the client can submit it directly to their insurance for partial reimbursement.
Key Terms and Definitions
NPI 1 (Type 1 NPI): A National Provider Identifier for individual providers (e.g., licensed therapists, psychologists).
NPI 2 (Type 2 NPI): A National Provider Identifier for organizations or group practices.
EIN (Employer Identification Number): A tax ID number issued by the IRS for businesses. Functions like an SSN but for a company.
TIN (Tax Identification Number): A general term for tax ID numbers, which can be an SSN or an EIN.
SSN (Social Security Number): A personal tax ID number for individuals. Sometimes used instead of an EIN for solo providers.
W-9: An IRS form that gives your legal name, address, and tax ID to insurance companies so they can pay you and report your income.
CAQH (Council for Affordable Quality Healthcare): A centralized online database where providers enter their professional and practice information, which payers use for credentialing.
Paneling: The process of joining an insurance company’s network of approved providers.
Credentialing: The verification process where an insurance payer reviews your qualifications, license, background, and application details before contracting.
Contracting: The step after credentialing where you sign an agreement with the payer outlining rates, policies, and responsibilities.
Medicare: A federal health insurance program for people 65+ or with certain disabilities. Requires NPI 2 for enrollment.
Medicaid: A joint federal–state program providing health coverage for low-income individuals and families. Requirements vary by state.
TRICARE: A federal insurance program covering active-duty service members, veterans, and their families.
Fee Schedule: The list of rates a payer agrees to pay you for covered services.
Effective Date: The date you are officially considered in-network and can begin billing the payer.
PAR vs. Non-PAR: Participating provider (in-network) vs. non-participating (out-of-network).
Recredentialing: The periodic review (often every 2–3 years) where payers re-verify your information to keep you in-network.
Superbill: An itemized receipt a provider gives to a client that lists services provided, diagnostic codes, and fees. Clients can submit it to their insurance for possible out-of-network reimbursement.
EOB (Explanation of Benefits): A statement from an insurance payer sent to the provider and/or client after a claim is processed. It explains what was covered, what was not, the contracted rate, and what the client may owe.
ERA (Electronic Remittance Advice): The electronic version of an EOB, sent directly to the provider (or billing system). It includes payment details, adjustments, and claim status.
CMS-1500: The standard claim form used by providers to bill insurance payers for outpatient services.
Clearinghouse: A third-party service that acts as a middle man between providers and insurance payers, checking claims for errors and transmitting them electronically.
Final Thoughts
Getting credentialed with insurance payers can feel like a long and detailed process, but it’s one of the most worthwhile investments you can make for your practice. Once you’re paneled, you’ll open the door to a wider client base, stronger referral opportunities, and more consistent income.
Stay organized, track your progress, and follow up regularly—these small steps make the process much smoother. And remember, credentialing isn’t a one-time task. Keep your documents, CAQH profile, and contracts up to date to ensure ongoing success as an in-network provider.
Once you are ready to start billing, Allia health makes it super easy for you to set up your payers, run real-time eligibility checks and submit claims with confidence.


